ie length has an easy built in visual inspection instrument: The belt is a go/no-go gauge
I use this example in class as part of a larger discussion on measurement methods. The lean six sigma principle is: if you can measure it by looking, don’t measure it any other way. This approach saves time and reduces opportunity for measurement errors.
I explained my tie tying process in class:

“Sheesh. How many times do you tie your tie each morning?” a student asked, tielessly.
I didn’t know. I had never tracked it (ugh... the shame of not measuring something so critical to a precise morning routine) but the average was probably between 2 and 3. Note the past tense. I have conquered this problem.
Here’s what I did: I filled out a value summary.
Just kidding.
Value summaries, are not for everything. But I did follow the 6-phase methodology.
1. Project Definition
Scope: Getting dressed with a tie in the morning.
SMART Goal: Reduce mean attempts to an appropriate length necktie attempts from ~2.5 to 1.1 by January 31, 2017.
2. Baseline Analysis
My baseline was 2+ attempts to get my tie to fall within spec. Some days I got lucky on the first try but I also recall failing three times before nailing it.
I studied my technique in the mirror, a quasi-gemba visit. For years I had been just running through the routine, almost unconsciously. In this sense, I hadn’t truly been to the necktie gemba because I hadn’t examined the process. Note to value improvement leaders: There’s so much more to going to the gemba than merely going to the gemba .
Most important discovery (which seems obvious now): No meaningful adjustments can be made to the length of the tie after cinching the knot.
3. Investigation
To identify sources of special cause variation, I pulled these six ties from the rack:
I noted potentially significant differences in all dimensions (length, width around the neck, thickness). I brainstormed other potential sources of variation and collected them in a cause and effect diagram using the 6 Ms. A cause and effect diagram is also known as a fishbone diagram. Shaping it like a fish can be fun, but isn’t necessary.
My necktie 6 M's:
| Mother Nature | Machine | Measurement | Method | Material | Man |
|---|---|---|---|---|---|
| n/a | n/a |
|
|
|
I’m not growing (not vertically, anyway) but how I carry my spine is an adjustment I can make throughout the day. |
Of all the sources of variation, those three dimensions (length, width, thickness) had the greatest inherent variation, and are outside my influence; I’d have to design a new process around them.
To find out how much of the tie is consumed by the knot and the wrap around the neck, I used this brown, medium thickness tie. I got lucky; it took only two attempts to get the point to the midline of the belt. Then I marked where the knot started and ended (yellow dots), and slipped the tie off.
I unraveled it and measured. From the wide point to the knot base is 18.0”, the knot of a medium thickness tie requires another 13.0”, and wrapping around my neck consumes another 13.75”.

I repeated this measurement process for a thick tie (failed three times) and a thin tie (three more failures) and filled out this table:
| Thickness | Point to Knot Base | Knot, Corner to Corner | Point to Wide Corner | Knot Base to Wide Corner | Point to Skinny Corner |
|---|---|---|---|---|---|
| Thin | 18.0 | 10.875 | 28.875 |
13.0 |
41.875 |
| Medium | 18.0 | 13.0 | 31.0 | 13.75 | 44.75 |
| Thick | 18.0 | 14.25 | 32.25 | 13.375 | 45.625 |
In this part of the investigation I learned that indeed, the thickness, length, and width impact the final placement of the tie’s tip. That is, these are important sources of variation that must be accounted for in the improved process.
Going back to my sample of ties, I measured their widths 18” up from the wide tip. Full disclosure: I didn’t wind up using all these in my improvement process. In the end, the Medium row is the only data that influenced the solution… Just confessing to a little over-processing.
HIERARCHY OF FORCING FUNCTIONS
- Mistake-Proofing
- Eliminate or Reduce the Impact
- Reduce Complexity
- Immediate Mistake Detection
- Visual Organization and Reminders
4. Improvement Design
I wanted to design a forcing function to ensure the proper tie length.
Remember, in the hierarchy of forcing functions, 1 is best and 5 is worst.
Happily, with my belt-as-gauge system, I was already at level 4. I made and immediately detected the mistake A LOT.
Climbing the scale to level 2, tucking the tie into my belt would eliminate the mistake. If this crisp, new look catches on it will not only eliminate the impact of this fashion blunder, it will also prevent the mistake of your tie falling into meals, sinks, and the other places gravity and carelessness take it. Alas, I am not courageous enough to launch a fashion trend. Some of you might be thinking, you could discard the tie altogether (also level 2). That would require a culture change I’m not ready to take on. And bow ties? I’m not willing to cross-train into that skill and I’m financially committed to the wardrobe I’ve got.
Armed with the results of my investigation, I set to designing a forcing function into the process above level 4. I noted a landmark that is consistent on most shirt collars: the point where the stitching around the top button ends its downward curve (noted with a blue dot below).
Testing out the improvement:
I selected this yellow tie because it has the same dimensions as the brown tie: medium thickness and 2.25” wide at the knot base. I measured 1” beyond the skinny-side knot corner (black sharpie dot), matched the dot to my landmark and I must admit, I got lucky. The result was bang-on, midline of the belt.


5. Improvement Implementation
Time to try the new process with all the ties.
I tested and adjusted for other dimension groups. This is necessary because knots on ties of different thicknesses and widths consume different lengths. But within the groups (e.g.: thick, 2.25” wide) the marker placement fell within tolerance. All my ties in common rotation now have forcing function marks.
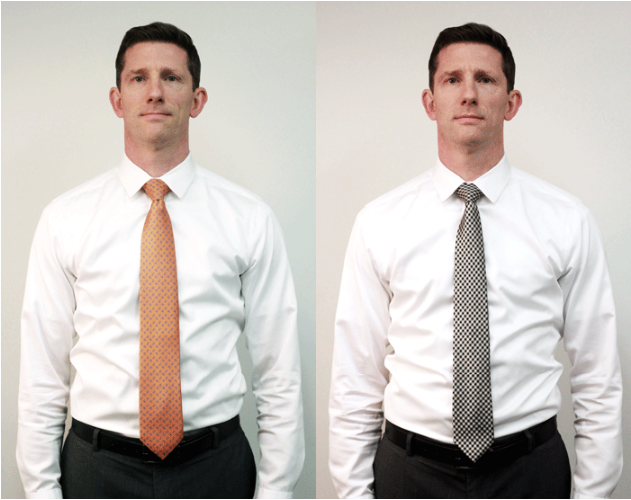
Below (orange tie): Thick, 2.5” wide, in-spec on first attempt.
Below (checkered tie): Thick, 2.25” wide, in-spec on first attempt.
6. Monitoring
The graph says it all.
Steve Johnson
Hospitalist Ryan Murphy introduces quality improvement (QI): The systematic and continuous approach to improvement.
This week, Steve describes a genius (yet simple) data collection tool: the check sheet. Colline Prasad and the SSTU nursing team used check sheets in their work reducing call lights, a project that turned out to be a triple-win; an intervention that improved patient perception of responsiveness, increased patient safety, and decreased nurse distraction.
Last time in the Dojo, the topic was standard work. This time, Steve gives local examples of great standard work within our walls. Though we still have a long way to go, we’re off to a great start.